

Hands-on Example of Docker Compose

TL;DR This article uses Docker Compose to create and manage multiple container applications. It's entirely hands-on.
Docker has made it easier to develop and package applications in reproducible environments. With Docker, you worry less about the infrastructure of your local machine and that of the production environment and worry more about worry about your code. Although a good product, sometimes when building you would want to run different parts of an application using Docker. What this means is you will create a couple of Dockerfiles and manage them. You orchestrate the containers yourself. This makes maintaining them both hectic and time-consuming.
Docker Compose is a tool used to run many Docker containers representing different parts of an application. To define and configure services (applications) with Compose, you use YAML files. The tool creates, starts, and stops these services that run as Docker containers. Docker Compose is great for rapid prototyping of microservices and continuous integration pipelines.
Before You Begin
- Install Docker with the official link. Ensure to follow the instructions for your local machine.
- Install docker-compose with the official link.
- Basic understanding of Docker and The Hitchhiker's Guide to the Containers: A Foolproof, Hands-on Docker Tutorial covers this.
Sample Application
Let's look at a docker-compose file with MYSQL configurations, call it docker-compose.yml.
services:
  mysql:
    image: "mysql:8.0"
    container_name: mysql
    restart: always
    ports:
      - "3300:3306"
    volumes:
      - dbdata:/var/lib/mysql/data
    environment:
      - MYSQL_DATABASE=database
      - MYSQL_USER=user
      - MYSQL_PASSWORD=password1212
      - MYSQL_ALLOW_EMPTY_PASSWORD=yes
volumes:
  dbdata:
Explanation
The above YAML file has some things to note.
- A service called
mysqlis created, and it depends on themysql:8.0published image on Docker Hub. - The local port 3300 maps to the container port 3306 to enable assess the MySQL container from the 3300 port.
- The restart policy is set to always restart an exited container.
- We define a docker volume which ensures data is persistent so we keep our data after the shut down of a container. It is important because Docker data is ephemeral.
- Environment variables are also defined to adjust the configuration (login details) of the MySQL instance.
Web Interaction
Flask microframework is used to interact with the database. To create this, follow the instructions below.
- Create a folder called
pythonand change directories into it. - Create a file called
app.pythat connects with the MYSQL container and processes inputs
from flask import Flask, render_template, request
import mysql.connector
import json

app = Flask(__name__)


config = {
    'host': 'mysql',
    'user': 'user',
    'password': 'password1212',
    'port': '3306',
    'database': 'data',
    'auth_plugin':'mysql_native_password'
}

connection = mysql.connector.connect(**config)

@app.route('/', methods=['GET', 'POST'])
def index():
    if request.method == "POST":
        details = request.form
        firstName = details['fname']
        lastName = details['lname']
        cur = connection.cursor()
        cur.execute("INSERT INTO MyUsers(firstName, lastName) \
        VALUES (%s, %s)", (firstName, lastName))
        mysql.connection.commit()
        cur.close()
        return 'success'
    return render_template('index.html')
- Create a file,
requirements.txtthat contains the dependencies of the python file.
Flask==1.1.2
mysql-connector-python==8.0.21
- Create an HTML page called
index.htmlthat accepts inputs from a user.
<HTML>
    <BODY bgcolor="cyan">
    <form method="POST" action="">
        <center>
        <H1>Enter your details </H1> <br>
        First Name <input type = "text" name= "fname" /> <br>
        Last Name <input type = "text" name = "lname" /> <br>
        <input type = "submit">
        </center>
    </form>
    </BODY>
</HTML>
- Create a Dockerfile to build a python image with the above files,
Dockerfilewith the following contents
FROM python:3.6-alpine3.11

WORKDIR /app

COPY . .

RUN pip install -r requirements.txt

EXPOSE 5000

ENTRYPOINT [ "python", "app.py" ]
- Leave the
pythonfolder and initialize the MYSQL instance by creating a database and a table. To do this, create a file calledinit.sqland fill up with the following
CREATE DATABASE data;
use data;

CREATE TABLE MyUsers (
    firstName VARCHAR(20),
    lastName VARCHAR(20),
);
- Finally, edit the
docker-compose.ymlfile and connect all the pieces.
version: "3"
services:
  mysql:
    image: "mysql:8.0"
    container_name: mysql
    restart: always
    ports:
      - "3300:3306"
    volumes:
      - dbdata:/docker-entrypoint-initdb.d/:ro
    environment:
      - MYSQL_DATABASE=data
      - MYSQL_USER=user
      - MYSQL_PASSWORD=password1212
      - MYSQL_ALLOW_EMPTY_PASSWORD=yes
  app:
    container_name: "flask_app"
    restart: always
    links:
      - mysql
    build:
      context: python
      dockerfile: Dockerfile
    ports:
      - "5000:5000"
volumes:
  dbdata:
- The build directs docker to the folder(context)
pythonand builds a docker image from the Dockerfile in the folder. - The volume is edited to initialize the MYSQL container with our
init.sqlfile.
The project should have the structure below:
├── docker-compose.yml
├── init.sql
└── python
    ├── app.py
    ├── Dockerfile
    ├── index.html
    └── requirements.txt
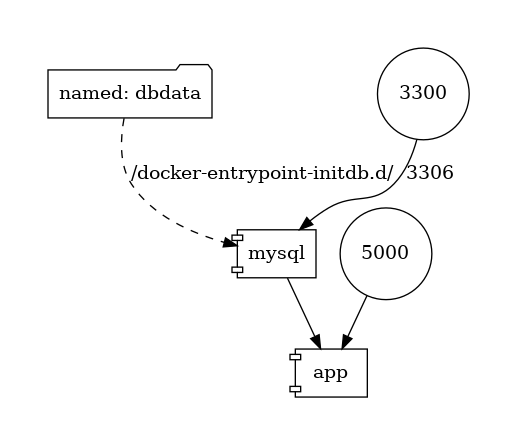
The image below shows the block diagram of the docker-compose file.
Execution
To execute the above block, run docker-compose up on your terminal and access the HTML on localhost:5000.
Conclusion
We have seen how Docker Compose works and some basic explanations. Things to note:
- Docker manages single containers while Docker Compose manages multiple container applications.
- Docker Compose is good for development, testing, and staging environments but in a production environment, you would be better off using Kubernetes or Docker Swarm.
- Environment variables and secrets are never checked into source control in a production setting. Use a
.envfile instead
Glossary
ephemeral: lasting for a very short time. This means without volumes, data generated and in docker are volatile and will be lost on termination of a container (either a restart or a rebuild).
orchestrate: Container orchestration is the automatic process of managing or scheduling the work of individual containers for applications based on microservices within multiple clusters.
service: A service is a section that defines all the containers used by our application.
3300: The default port for connections should be port 3306, but for easier understanding of where local ports and container ports are in a file, 3300 is used.


